

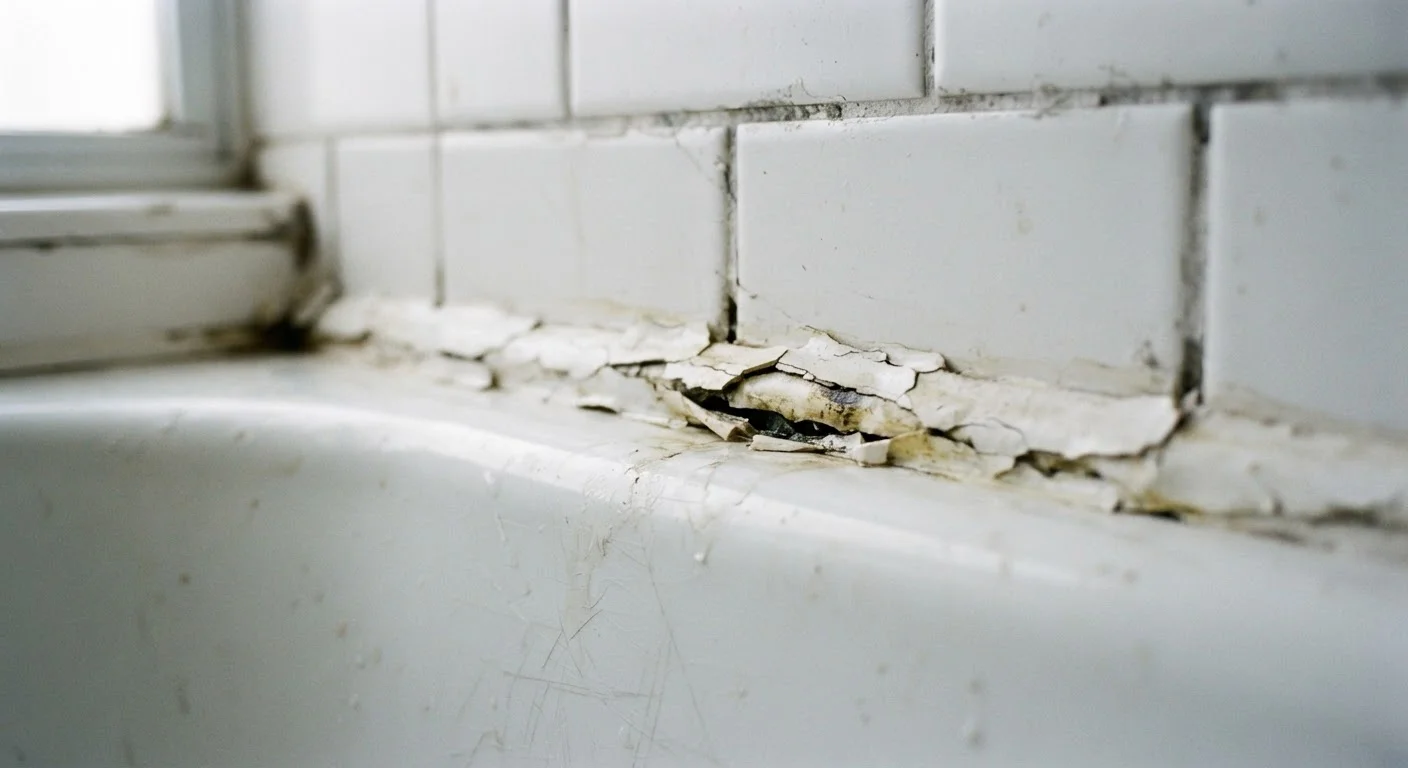
What Caulk Actually Does in Your Home
Think of caulk as the flexible mortar between your home's rigid surfaces. Wherever two different materials meet - tub and tile, window frame and siding, countertop and backsplash - there's a joint that moves, however slightly. Temperature fluctuations cause materials to expand and contract. Humidity makes wood swell. Foundation settling shifts walls. Caulk accommodates that movement while keeping water, drafts, and insects out.
It shows up in more places than most homeowners realize: bathroom and kitchen fixtures, exterior windows and doors, baseboards, pipe penetrations, and trim details throughout the house. Because it serves as a primary water barrier in many of these locations, failed caulk isn't a cosmetic issue - it's an entry point for damage. For a deeper look at how water finds its way in, see what building science says about wet area waterproofing.
5-10 years
Typical lifespan of bathroom caulk
Caulk in high-moisture zones like showers and tubs is generally expected to need replacement within this window under normal use conditions.
$1,000+
Average cost of water damage repairs
The EPA estimates that household water leaks - many preventable with proper sealing - waste significant money and cause structural damage that compounds over time.
90%
Of caulk failures linked to poor prep or wrong product
Home improvement professionals commonly attribute most premature caulk failures to surface preparation errors or mismatched product selection rather than product defects.
The Most Common Reasons Caulk Fails
Caulk doesn't last forever, but it often fails sooner than it should. Understanding the causes helps you extend the life of new applications and spot trouble early.
Age and Wear
Even quality caulk has a finite lifespan. Most silicone formulations hold up for roughly 10-20 years in ideal conditions, while latex varieties may need replacing every 5 years - sooner in high-traffic, high-moisture zones. Natural UV exposure, heat cycling, and repeated wetting and drying degrade the polymer chains that give caulk its flexibility.
Poor Surface Prep
This is the single most preventable cause of early failure. Caulk applied over soap scum, moisture, old residue, or a poorly dried surface simply won't bond correctly. The substrate needs to be clean, dry, and free of previous sealant. Rushing this step is the most common DIY mistake - and one that mirrors the prep failures behind premature paint peeling as well.
Wrong Product for the Location
Latex caulk in a shower enclosure, for example, will absorb water and lose adhesion quickly. Choosing the right material for the right joint matters just as much as application technique.
Excessive Joint Movement
Some joints move more than a given caulk formula can handle. Expansion joints around large tile installations or exterior materials may require a more flexible, higher-elongation product. When the underlying movement exceeds the sealant's elasticity, cracking follows.
Application Errors
Applying too thick a bead, not tooling it properly into the joint, or caulking in cold or humid conditions all compromise adhesion and cure quality. Most caulk manufacturers specify temperature and humidity ranges for a reason.
Signs It's Time to Reapply
Catching caulk failure early is far easier - and cheaper - than dealing with the water damage that follows. Inspect these high-priority areas at least once a year:
- Visible cracks or gaps: Any separation along the bead, especially where it meets the substrate, is an immediate reapplication trigger.
- Shrinkage: Caulk that has pulled away from one or both surfaces, leaving a visible void or recessed channel.
- Peeling or lifting edges: The bead lifts away from the surface, often starting at the ends of the run.
- Discoloration or mold: Black or pink staining that can't be cleaned off typically means mold has colonized the sealant itself.
- Soft or spongy texture: Healthy cured caulk is firm but slightly flexible. A mushy feel suggests moisture intrusion beneath the bead.
- Drafts near windows or doors: Air infiltration you can feel is a sign exterior caulk has failed. Poorly sealed exterior joints can also contribute to gutter-related water problems covered in our guide on gutter inspection and maintenance.
Annual Caulk Inspection: Make It a Habit
Add a caulk walkthrough to your yearly home maintenance routine - ideally in spring, after the stress of winter temperature swings. Check bathrooms, kitchen fixtures, exterior windows, doors, and any pipe penetrations. Catching a $5 reapplication job early prevents a far more expensive water damage repair later.
How to Remove and Reapply Caulk Correctly
The process isn't complicated, but skipping steps leads to the same failure you're trying to fix.
- Remove all old caulk. Use a dedicated caulk removal tool or utility knife to cut and peel away the existing bead. Avoid gouging tile or tub surfaces. Plastic scrapers work well on delicate finishes.
- Clean the joint thoroughly. Wipe the area with isopropyl alcohol or a mild cleaning solution. Remove all soap residue, grease, or mold. Allow the surface to dry completely - in bathroom applications, give it 24 hours if possible.
- Choose the right caulk. Use 100% silicone for showers, tubs, and sinks. Use paintable latex for interior trim and dry areas. For exterior applications, look for formulas rated for outdoor UV and temperature exposure.
- Apply in a single, steady pass. Hold the gun at a consistent angle, moving at an even pace. A bead roughly the width of the joint is sufficient - avoid overfilling.
- Tool the bead immediately. Use a caulk-finishing tool or a dampened finger to press the bead firmly into the joint and create a smooth, concave surface.
- Allow full cure time before exposing to water. Most silicone caulks require 24-48 hours to cure fully. Check the product label for specifics.
For related repair confidence, our beginner's wall repair guide covers similar prep-and-patch fundamentals that translate well to caulk work.
When to Call a Professional
Most caulk replacement is a manageable DIY task. However, if you find signs of water damage behind tile, rotted substrate beneath a tub surround, or extensive mold growth on drywall, stop and consult a licensed contractor before resealing. Trapping moisture under fresh caulk makes a structural problem significantly worse. See our guidance on common home maintenance myths for more on situations where DIY fixes can backfire.
Frequently Asked Questions
In high-moisture areas like tubs and showers, plan to inspect caulk annually and reapply every 5 years at most. Silicone formulations may last longer, but daily exposure to water and soap accelerates breakdown. Don't wait for visible gaps - act at the first sign of cracking or discoloration.
This is generally not recommended. New caulk applied over old material bonds to the existing sealant rather than the substrate, meaning it's only as durable as whatever's beneath it. Fully removing old caulk with a caulk remover tool or utility knife gives the fresh application the cleanest, most adhesive surface possible.
Silicone caulk is more flexible, waterproof, and resistant to mold, making it the better choice for wet areas like showers and kitchen sinks. Latex (acrylic) caulk is easier to apply, paintable, and better suited for dry areas like window and door trim. Using the wrong type in a wet zone is a common cause of early failure.
New caulk cracks prematurely when applied too thickly, when the surface wasn't fully dry or clean before application, or when the wrong formulation was used for that joint's movement demands. Over-tooling - smoothing too aggressively - can also compromise the bead's integrity before it cures.
Dark discoloration is often mold growth on or beneath the caulk surface, especially in persistently damp areas. However, some darkening can also result from soap scum or mineral deposits. Mold-affected caulk should be fully removed and replaced - surface cleaning alone won't resolve contamination that has penetrated the sealant.
The content provided on our blog site traverses numerous categories, offering readers valuable and practical information. Readers can use the editorial team’s research and data to gain more insights into their topics of interest. However, they are requested not to treat the articles as conclusive. The website team cannot be held responsible for differences in data or inaccuracies found across other platforms. Please also note that the site might also miss out on various schemes and offers available that the readers may find more beneficial than the ones we cover.